Painting Buildings with Secret Weapon Weathering Pigments
•Posted on June 25 2013
This is a guest post by Warsenal customer Adam Huenecke (popgoestheworld).
Nothing sucks harder than playing on a table covered with unpainted terrain. Okay, lots of things suck harder than that (Dengue Fever, Economic Depression, etc.), but if you are shelling out money for detailed buildings, you really ought to put a little time into getting them painted.
This tutorial will go over how to get your new Warsenal Alpha Building painted in a cheap, quick, and effective way. I was originally going to make this a tutorial on airbrushing, except I realized a couple of things-
- Airbrushes are expensive, and not that many gamers have them
- If you bought an airbrush, you probably figured out how to use it on your own (you wealthy lucre).
So instead, this tutorial is going to show you how to shade your buildings using Secret Weapon’s Weathering Pigments, which for only a couple bucks, can give you a similar look to an airbrushed building (and arguably more control than an airbrush- especially one in the hands of an amateur). Secret Weapon Weathering Pigments are the weapons of Jedi Painters. Not as random or clumsy as an airbrush; An elegant pigment for a more civilized painter.
For this tutorial, you will need the following:
- 1 Warsenal “Alpha” Building (If mine looks a little different, it is because I got one of the “limited edition” early roofs. It’s not a prototype- it’s “limited edition.”)
- Secret Weapon Weathering Pigment (specifically “Exhaust Black”)
- Base Color Paints (Whatever colors you choose- I’ll get to this later)
- A couple of decent brushes
- Spray Primer (Preferably light grey)
- A couple old brushes (I used a ragged-ass old #6 brush)
- Testor’s Dullcoat Spray
Assembly, Planning, and Priming
First, you need to figure out just what the hell you are building. Yes, you can easily figure out the basic building instructions, but what kind of building is this? Is it a run-down tenement, seething with unsavory types? Is it a commercial space, designed for selling various sci-fi goods? Is it a government building, seething with unsavory types?
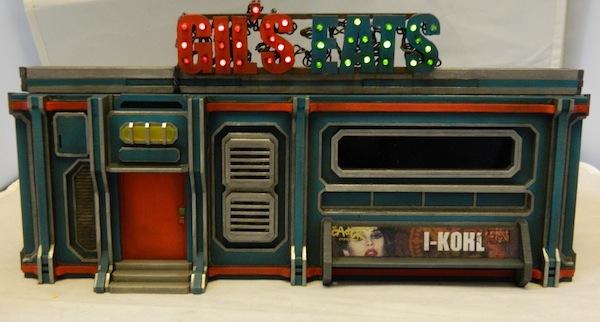
For my building, I decided that my table needed more dining options (right now it only has a starbucks and a Chinese takeout place), so I decided to make my building a diner. This helped me find inspiration for my color scheme, and guided my decision to make a light-up sign for the roof (not included in your purchase of the Alpha building). I made letters out of some plastic card, drilled some holes in it, and put some LED bulbs in, with a power source attached to the underside of the roof.
*Side note- After Christmas, raid the hell out of the seasonal sections of your local department and hobby stores- You can find lots of cheap trees, and things like string lights you can easily repurpose. Here, I used some christmas village string lights that cost maybe a dollar after Christmas. I pulled out half of the lights and re-plugged them so half of the strand would be red, and half green.
Anyway, after googling some pictures of diners, I decided on a silver, aquamarine, and red scheme (similar to those of 1950s diners). The various details of the Alpha building lent easily to this scheme, so I figured out what parts I would paint in which way. I then primed my entire model in light grey primer, leaving off the light fixtures and window frames until later.

Be careful not to prime too heavily- these buildings are designed to fit together snugly, and paint and primer built up too thick on the tabs will prevent it from fitting together well.
A note on primer- I don’t spend much money on it. I go with the cheapest possible stuff from my local superstore. In my experience, it is just as good as the expensive stuff (if not better)
Base Coat
Once your primer coat is nice and dry (at least 24 hours or so), you can go ahead and base coat your building. For the facade of my building, I used Privateer P3 Meridus Blue, Cold Steel, and Khador Red. For the sides and back of the building, I used P3 Greatcoat Grey on the frame, and left some areas the grey of my primer coat. The dumpster is P3 Gnarls Green, with the lid a mixture of P3 Thamar Black and Greatcoat Grey. The stairs are P3 Trollblood Highlight. I applied these paints with a #5 round brush, being particularly careful around the areas I was leaving the color of the primer (as I would have no way to easily re-paint those parts the primer color without masking everything off and re-spraying it.
I painted the inside of the light fixtures P3 Morrow White, so when I installed the acrylic, it would have a natural “glow.”


Using a color printer and some photo paper, I also designed a nice ad for my front bench. I carefully measured the bench, and then designed the ad using Photoshop Elements to those specifications. I then imported the file to a Word document, making sure it scaled to 100%, then printed it on 4X6” photo paper. I allowed the print to dry for several hours, then gave it a clear coat with my Testor’s Dullcoat. I then cut it out, and glued it to my bench using thinned-out Elmer’s Wood Glue. I love adding these kind of details to give my terrain character.
After your paint is dry, go ahead and give the entire thing a nice, dull clear coat (I use Testors). This is the reason you don’t want to install your clear components until last. This dullcoat will take down the shine on your glossier colors, and make your weathering pigments stick better.
Shading
I think this is the most rewarding part of the painting process, because you get results quick, and it is fun. Up to this point your building might be looking extra crisp, clean, and otherwise bright and stupid. This is where it gets real.
Secret Weapon’s Weathering Pigments seem uniquely qualified to shade laser-cut MDF and acrylic terrain, because the powder gathers in the little cut-outs, nooks, and crannies so well. You will find that you make a lot of progress quickly with this process, though you want to start on the interior, or on some less-visible areas while you get into the groove (pardon the pun)
Using your beat-up brush (if you use a non-beat-up brush, it will be beaten up by the time you are done), brush some of your Secret Weather Black weathering pigment into the areas you want shadows or grime. DOn’t get your brush wet or anything- just brush the dust on dry. Stick to the crevasses and the “borders” of your wider fields- on areas like the roof and floor, stick to the edges, and try not to mess up the middle too much.
You might find you have to apply pigment to an area a couple of times to get the depth you desire, but you should be able to pick up on how to do this pretty easily with a little practice. If you are doing very light greys or whites, you will want to be a little more judicious with your application, but overall, it is a pretty simple, straightforward process.


A couple of notes-
1.) You are going to get it on your hands, and probably leave some finger prints. Most of these will probably wipe off with a clean paper towel or something, but you want to be careful. Try to only hold your building by the edges during this process, and make sure your hands are as dry and clean as possible.
2.) Any moisture is going to make the pigments behave differently. Keep it dry.
3.) By the time you are done, you are going to look like you groped a coal miner. This is not a clean process. Be careful, and take any precautions you normally would when working with particulates. Don’t come crying to me when you stain your nice white carpet, or get mesothelioma.
When your building looks appropriately grimey and shady, give your entire building another overspray of Dullcoat. This will bind the pigment in place, and make your building safe to fondle again.
Highlighting and Detailing
Once your dullcoat is dry, you can do some final finishing. For the grey areas of my building, I highlighted the whole building by very lightly drybrushing some P3 Hammerfall Khaki over everything. This picked out the smallest details, and gave the building a little more depth. For the steps and the front, I used a very light drybrushing of P3 Menoth White Highlight.
I also went back over my metal components with a little more P3 Cold Steel to pick the shininess back up a bit. I thinned out some P3 Bloodstone, and used this to add some little streaks of rust around my sign and back door (please withhold your comments about my rusty back door).
I used a paint marker to add some graffiti to my bench and dumpster. I find that the tip of a paint marker is usually equivalent to a scale representation of a spray can nozzle, so this is a pretty simple process (though don’t over do it- it should add flavor, and not take over your design).
For the keypads on the doors, I used P3 Iosian Green for the screens, highlighted with a little P3 Necrotite Green. The Keypads are P3 Khador Red Highlight, highlighted with P3 Cygnus Yellow.
Finally, I added my acrylic components (gluing them in place with an epoxy to make sure I avoided any clouding), and I was done.


I hope you find this painting technique as fun and rewarding as I did. I felt like I had a lot more control over my shading with the pigments than I do with my airbrush, and this is a much cheaper alternative for getting nice, soft shading. Beyond that, I feel like the pigments get into the smallest corners of the building even better than the airbrush, without any overspray or accidental masking.
Even if you are experienced with an airbrush, I recommend giving this technique a try. You might like it, and it gives your buildings a uniquely dingy feel.
Comments
0 Comments
Leave a Comment